I’ll never forget the first time I held a menstrual cup in my hands. I was sitting on my bathroom floor, staring at this silicone bell-shaped thing, wondering how on earth it was supposed to work. My grandmother had just handed me her little notebook filled with years of research on natural health solutions, and while it didn’t have period cup instructions, it taught me something important: sometimes the best solutions are the ones that work with your body, not against it.
That was three years ago, and I haven’t looked back since. Today, I want to share everything I learned about how to use a period cup so you don’t have to spend two hours watching YouTube videos like I did. This guide covers everything from choosing the right size to mastering insertion techniques, troubleshooting leaks, and proper cleaning methods. Whether you’re tired of buying disposable products every month or just curious about making the switch, I’ve got you covered.
What Is a Period Cup and Why Should You Care?
A menstrual cup is a reusable, bell-shaped cup made from medical-grade silicone, rubber, or elastomer that collects menstrual blood instead of absorbing it like tampons or pads. You fold it, insert it into your vagina, and it opens up to form a seal that prevents leaks.
Here’s what sold me: one cup lasts up to 10 years. That’s over 3,000 tampons you won’t buy. Plus, you can wear it for up to 12 hours depending on your flow, which means no more sneaking tampons into the bathroom at work or worrying about changing products every few hours.
The environmental impact matters too. My best friend calculated that she was throwing away around 250 period products every year. Now she uses one reusable cup. The science backs this up: studies show that menstrual cups are safe, don’t increase infection risk when used properly, and many users report fewer cramps and less odor compared to disposable products.
Choosing the Right Menstrual Cup for Your Body
This part stressed me out initially because there are so many options. But once I understood the basics, it became simple.
Understanding Menstrual Cup Sizes
Most brands offer two main sizes:
Smaller size (usually labeled Size 1 or Small): Best for people under 30 who haven’t given birth vaginally, or those with lighter flow and stronger pelvic floor muscles.
Larger size (usually labeled Size 2 or Large): Recommended for people over 30, those who’ve given birth vaginally, or anyone with heavier flow.
I started with a smaller size because I was 22 and had medium flow. The size guide on most brand websites helps, but honestly, you might need to try one to know for sure. Many companies offer starter kits with both sizes.
Checking Your Cervix Height
This changed everything for me. Your cervix height determines how high or low the cup should sit. Here’s how to check:
Wash your hands thoroughly, then insert a clean finger into your vagina during your period. If you can reach your cervix easily (within one or two finger lengths), you have a low cervix and need a shorter cup. If you have to reach quite far (three finger lengths or more), you have a high cervix and can use a longer cup.
My cervix sits pretty low, so I needed a shorter cup. When I first tried a longer one, it felt uncomfortable and the stem poked me. Switching to a shorter model made all the difference.
Material Matters
Most cups use medical-grade silicone because it’s hypoallergenic and durable. Some are made from rubber or TPE (thermoplastic elastomer). I stick with silicone because it’s easier to clean and doesn’t hold odors.
Preparing and Sterilizing Your Period Cup Before First Use
Before you use your menstrual cup for the first time, you need to sterilize it. This kills any bacteria from manufacturing and packaging.
How to Sterilize a Menstrual Cup
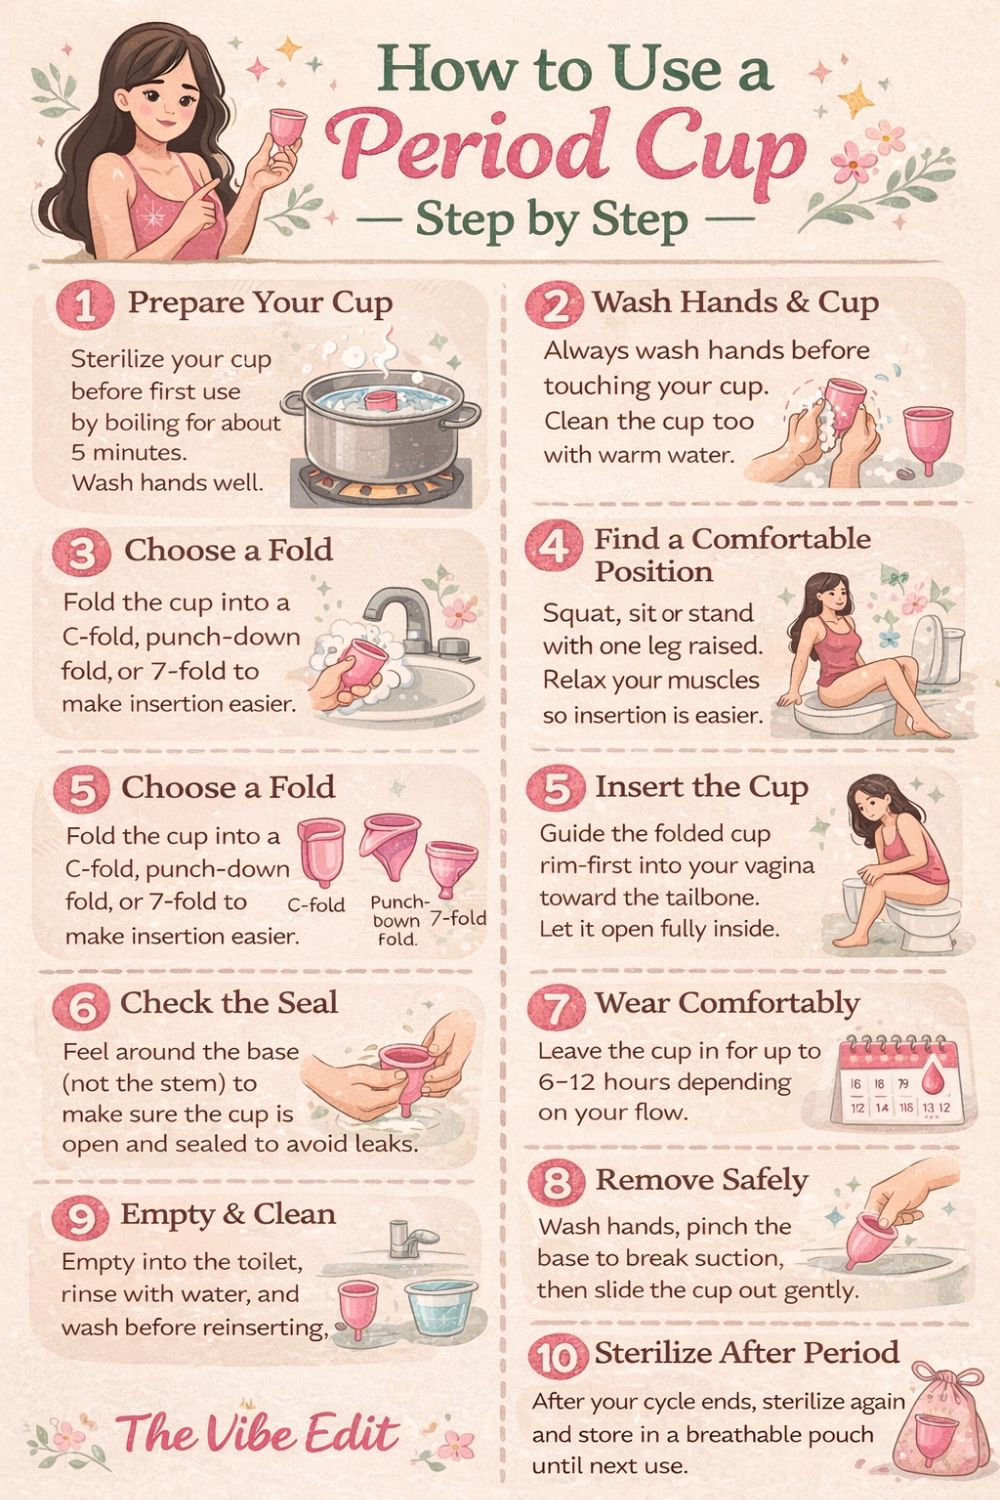
Boiling method: Place your cup in a pot of boiling water for 3 to 5 minutes. Make sure the cup doesn’t touch the bottom of the pot (I use a whisk to keep it floating). Set a timer so you don’t forget it on the stove.
Steam sterilizer: Some brands sell special sterilizers that use steam. These are convenient but not necessary.
After the initial sterilization, you should also sterilize your cup at the end of each cycle before storing it. Between uses during your period, just rinse with water and mild soap.
How to Insert a Menstrual Cup: Step by Step
This is the part that scared me most. But after a few tries, insertion became second nature. The key is staying relaxed. When you tense up, your muscles tighten and everything becomes harder.
Best Menstrual Cup Folds for Easy Insertion
The fold you choose makes a huge difference. Here are the folds I’ve tried:
- C-fold (also called U-fold): Flatten the cup, then fold it in half to create a C shape. This is the most common fold and creates a smaller insertion point. I started with this one.
- Punch-down fold: Push one rim down into the cup with your finger, creating a small triangular point. This creates the smallest insertion point and was actually easier for me than the C-fold once I got the hang of it.
- 7-fold: Flatten the cup and fold one corner down diagonally to create a 7 shape. Good for firmer cups.
- Origami fold: Similar to punch-down but folded differently. Creates a very small insertion point.
- Labia fold: Fold the cup almost flat with both rims together. This works well for softer cups.
Try different cup folds to see what works best for you. The punch-down became my go-to because it made insertion smooth and the cup popped open easily.
Step-by-Step Insertion Instructions
- Wash your hands thoroughly with soap and water. This is critical for preventing infections.
- Find a comfortable position. I usually stand with one leg propped on the toilet seat, but you can also sit on the toilet or squat. Some people prefer lying down when learning.
- Fold your cup using your preferred method. Hold it firmly with one hand.
- Take a deep breath and relax your pelvic floor muscles. This is important. If you’re tense, insertion will be uncomfortable.
- Gently separate your labia with your free hand and guide the folded cup into your vagina at a horizontal angle, aiming toward your tailbone (not straight up). Many beginners make the mistake of angling up instead of back.
- Insert the cup until the stem is just inside or barely visible. The cup should sit lower than a tampon. If the stem bothers you, you can trim it later.
- Release the fold and let the cup open. You might feel it pop open or you might not. Run a finger around the base of the cup to check that it’s fully opened and formed a seal. If you feel any folds or dents, it hasn’t opened completely.
- Give the cup a gentle twist or rotate it 360 degrees. This helps ensure the seal is secure and prevents leaks.
Troubleshooting Insertion Problems
If the cup won’t open, try these fixes:
Remove it, rinse with cold water (this makes softer cups firmer), and try again. Use a different fold. The punch-down opens more easily than the C-fold for many people. After inserting, reach up and press on the vaginal wall opposite the fold to help it pop open. Try a firmer cup if yours is too soft to open reliably.
If insertion feels uncomfortable or painful, you’re probably too tense or not using enough moisture. Rinse the cup with water before inserting (this acts as a natural lubricant), or use a water-based lube. Never use oil-based products as they can degrade silicone.
How to Remove a Menstrual Cup Safely and Mess-Free
Removal scared me even more than insertion at first. I had visions of blood everywhere and the cup getting stuck forever. Spoiler: neither happened.
Step-by-Step Removal Instructions
- Wash your hands thoroughly. Always.
- Find a comfortable position. I remove mine while sitting on the toilet so any spills go straight into the bowl.
- Relax and take deep breaths. Tensing makes your pelvic floor muscles grip the cup tighter.
- Bear down with your pelvic floor muscles like you’re having a bowel movement. This brings the cup lower and makes it easier to reach.
- Reach in and locate the stem. Gently pull on it until you can reach the base of the cup. Don’t just yank on the stem or you’ll create a mess.
- Pinch the base of the cup firmly to break the seal. This is the most important step. If you pull without breaking the seal, it can be uncomfortable and cause spillage.
- Continue pinching the base while you gently rock the cup side to side and pull it down and out. Keep it upright as much as possible to avoid spilling.
- Empty the contents into the toilet, rinse the cup with water, and reinsert if you’re still on your period.
Making Removal Less Messy
I won’t lie, my first few removals were messy. Here’s what helped:
Practice during lighter flow days when there’s less blood. Remove in the shower while you’re learning. Everything rinses away easily. Keep toilet paper handy to wipe your hands. Use wet wipes for easier cleanup. Don’t overfill the cup. If you have heavy flow, empty it more frequently than every 12 hours.
The messiest part for me was getting blood on my hands. Now I keep a small bottle of water next to the toilet for rinsing the cup before I carry it to the sink.
Troubleshooting Common Menstrual Cup Problems
Even after three years, I occasionally have issues. Here’s how to fix the most common problems.
Stopping Menstrual Cup Leaks
Leaking was my biggest frustration when I started. The cup would seem fine, then suddenly I’d feel wetness. Here’s what causes leaks and how to fix them:
- The cup isn’t fully open: Run your finger around the rim after insertion to check. If you feel dents or folds, reach up and press on the vaginal wall to help it open, or remove and reinsert.
- The seal isn’t forming: After inserting, try rotating the cup or pulling down gently on the base. You should feel slight resistance if the seal is working.
- The cup is too high or too low: If your cup sits too high, it might settle above your cervix instead of catching the blood. If it’s too low, the seal might not form properly. Try adjusting the depth.
- Your cervix is inside the cup: This takes up space and causes overflow. If you have a low cervix, you need a shorter cup with more capacity.
- Wrong size: If you consistently leak even when the cup is properly positioned, you might need a larger size or higher capacity cup.
- You need to empty more often: Even though you can wear cups for up to 12 hours, heavy flow might require more frequent emptying.
I had persistent leaks until I realized my cervix was sitting inside the cup, taking up half the capacity. Switching to a wider cup solved everything.
Dealing with Discomfort
If your period cup feels uncomfortable, something’s wrong with the fit or position. Comfort should be complete; you shouldn’t feel it at all when it’s properly placed.
- The stem pokes you: Trim it shorter or remove it entirely if your cup sits low enough.
- The cup feels too big: Try a smaller size or softer cup.
- You feel pressure: The cup might be too firm or too large. Softer cups work better for sensitive bladders.
- Insertion hurts: You’re probably tense or need more lubrication. Take your time and breathe.
Addressing Other Issues
- The cup won’t stay in place: Your pelvic floor muscles might push it down. Try a shorter cup or do pelvic floor exercises to strengthen those muscles.
- You can’t reach the cup: Don’t panic. Bear down and the cup will move lower. If you still can’t reach it, squat deeply or try different positions. The cup cannot get lost inside you.
- Odor issues: Rinse thoroughly between uses and sterilize properly between cycles. Some people soak their cups in diluted hydrogen peroxide or vinegar to remove odors.
Cleaning, Care, and Storage Between Cycles
Proper care keeps your menstrual cup safe and extends its life. My first cup lasted seven years before I replaced it.
During Your Period
Rinse your cup with cold water first (hot water can set stains), then wash with warm water and mild, unscented soap. Make sure to clean the air holes at the rim with a toothpick or by squeezing water through them.
Don’t use harsh soaps, oils, or antibacterial products. These can irritate your vagina or degrade the silicone. Plain soap and water work perfectly.
Between Periods
After your cycle ends, sterilize your cup by boiling it for 3 to 5 minutes. Let it cool and dry completely.
Store it in a breathable cotton bag (most cups come with one) or a well-ventilated container. Never seal it in plastic or airtight containers because moisture can promote bacterial growth.
I keep mine in a small cloth pouch in my bathroom drawer. It’s always ready for the next cycle.
When to Replace Your Menstrual Cup
Replace your cup if you notice any of these signs:
Tears, holes, or cracks. Changes in texture (sticky or powdery surface). Persistent odor that won’t wash away. Discoloration that doesn’t improve after cleaning.
Most cups last 5 to 10 years with proper care. That’s incredible value compared to monthly disposable products.
Frequently Asked Questions About Period Cups
How long can I wear a period cup?
You can wear a menstrual cup for up to 8 to 12 hours depending on your flow and the brand’s instructions. On heavy flow days, I empty mine every 4 to 6 hours. On light days, I can go the full 12 hours. Just empty it when it’s full or at least twice daily to prevent overflow and maintain hygiene.
Does using a menstrual cup hurt?
No, using a period cup shouldn’t hurt if you’re inserting it correctly. The first few times might feel awkward or slightly uncomfortable as you learn, but actual pain means something’s wrong. Stay relaxed during insertion, try using water or water-based lube, experiment with different folds, and make sure you’re breaking the seal properly during removal. If discomfort continues, try a different size or softer cup.
Can I use a menstrual cup with an IUD?
Usually yes, but check with your healthcare provider first. The concern is that breaking the seal during removal might pull on the IUD strings. To be safe, make sure you can feel your IUD strings, always break the seal by pinching the base before removing your cup, and ask your doctor to trim your IUD strings shorter if needed. I know several people with IUDs who use cups without any problems.
How do I sterilize a menstrual cup?
Sterilize your menstrual cup by boiling it in water for 3 to 5 minutes before first use and after each cycle. Place it in a pot of boiling water, making sure it doesn’t touch the bottom (use a whisk to keep it floating), and set a timer. You can also use a sterilizer specifically designed for menstrual cups. Let it cool and dry completely before storing it in a breathable bag.
How do I stop my menstrual cup from leaking?
To prevent menstrual cup leaks, first make sure the cup has fully opened after insertion by running your finger around the rim to check for dents. Ensure a proper seal by gently rotating the cup or tugging on the base. Check that your cervix isn’t sitting inside the cup, which reduces capacity. Try adjusting the depth (higher or lower), experiment with different cup folds, or switch to a different size if leaks persist. On heavy flow days, empty more frequently even if you haven’t reached 12 hours.
Quick Tips for Period Cup Success
- Practice during a light day or in the shower: Your first attempts will be easier if you’re relaxed and not worried about making a mess. I spent my first practice session in the shower with no time pressure, which helped me figure out the mechanics without stress.
- Create a first-use checklist and keep a demo video bookmarked: I made a simple checklist: wash hands, choose fold, relax, angle back not up, check seal, rotate. Having this written down helped me remember all the steps when I was nervous. Bookmark a good tutorial video to reference when you need a visual reminder.
Your Next Steps: Making the Switch to Period Cups
Learning how to use a period cup takes patience, but it’s worth it. My advice: give yourself three full cycles to adjust. The first cycle you’re figuring out insertion. The second you’re mastering removal and finding the right position. By the third, it becomes automatic.
Start by choosing a cup based on your size guide assessment and cervix height measurement. Order from a brand with good return policies in case you need a different size. Sterilize before first use, practice insertion with different folds, and don’t get discouraged by early leaks or awkward moments.
The benefits are real: no more buying tampons every month, less waste, fewer cramps for many users, and the freedom to wear one product for up to 12 hours. Once you get past the learning curve, you’ll wonder why you didn’t switch sooner.
I still think about that day on my bathroom floor, confused about how this thing was supposed to work. Now I grab my cup without thinking, insert it in less than 30 seconds, and go about my day. That’s the goal for you too, and you’ll get there with a little practice and patience.