Knowing how to clean your makeup brushes is one of those small skills that changes how your whole routine feels. Last spring I pulled my favorite foundation brush out of its pouch and noticed the bristles felt stiff and slightly greasy. I had used it for months and could not remember washing it once. My skin had also been throwing small breakouts along my jawline, and I was trying to work out what had changed.
That moment sent me down a research rabbit hole. This guide shares what I learned, in plain steps you can follow at your own sink, with no fancy tools needed.
How to Clean Your Makeup Brushes: The Quick Answer
To clean makeup brushes, rinse the bristles with lukewarm water, apply a gentle cleanser, massage and lather, rinse until clear, squeeze out excess water, reshape, and dry flat. Clean foundation and concealer brushes weekly and eye brushes regularly.
Here is the same method as a quick checklist:
- Wet only the bristles with lukewarm water.
- Add a small amount of gentle soap or makeup brush cleaner.
- Massage the bristles on your palm or a silicone cleaning mat.
- Rinse until the water runs clear.
- Press out extra water with a clean towel.
- Reshape the brush head with your fingers.
- Lay the brush flat to air dry.
Why Should You Clean Your Makeup Brushes?
Your brushes touch your face every day. That means they collect product buildup, dirt and oil, and traces of whatever is on your skin. Over time that layer can hold bacteria and make your makeup look patchy.
The American Academy of Dermatology notes that dirty brushes can contribute to irritation and breakouts, and it recommends washing them regularly. A dirty brush is not the only reason skin acts up. Still, clean tools cost almost nothing, and they make a visible difference in how foundation blends.
What Happens When You Skip Cleaning
Here is what I noticed after a few weeks of neglect:
- My foundation went on streaky.
- Powder looked cakey around my nose.
- The brushes smelled slightly off.
Once I started washing them again, my makeup looked smoother within a week.
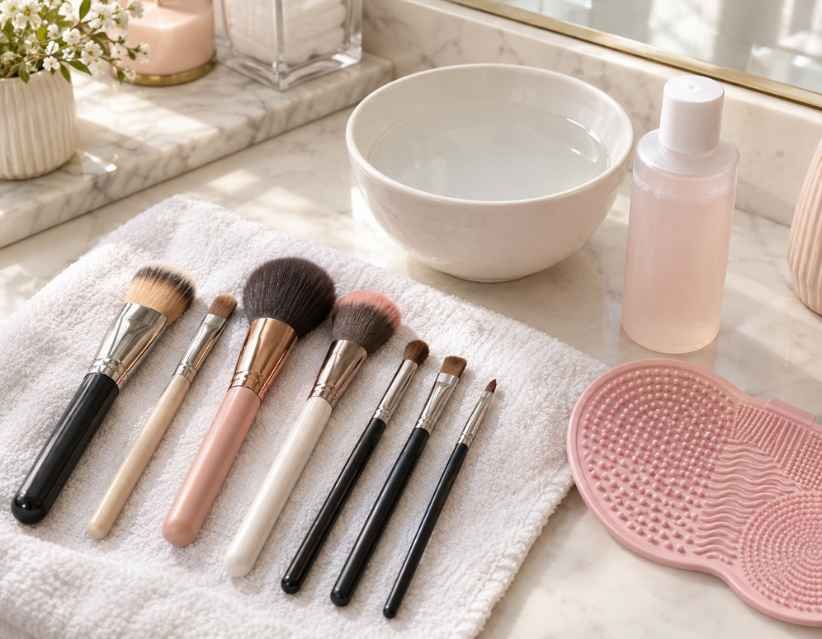
What You Need to Clean Makeup Brushes at Home
You do not need a shelf full of products. Most of this is probably already in your bathroom.
- Gentle soap or cleanser: a mild liquid hand soap, baby shampoo, or a dedicated brush cleanser.
- Lukewarm water: never hot, since heat can loosen the glue that holds the bristles in place.
- A clean towel: microfiber or soft cotton both work well.
- A small bowl or sink: it keeps rinsing controlled.
- A silicone brush cleaning mat or pad (optional): the texture helps lift product out of dense bristles.
Take a minute to look at your brush before you start. Every brush has bristles, a ferrule (the metal band), and a handle. Keep the ferrule as dry as you can, because water seeping inside weakens the glue over time.
If you want help choosing between brush shapes first, read my guide to makeup brushes and their uses.
How to Clean Makeup Brushes in 7 Easy Steps
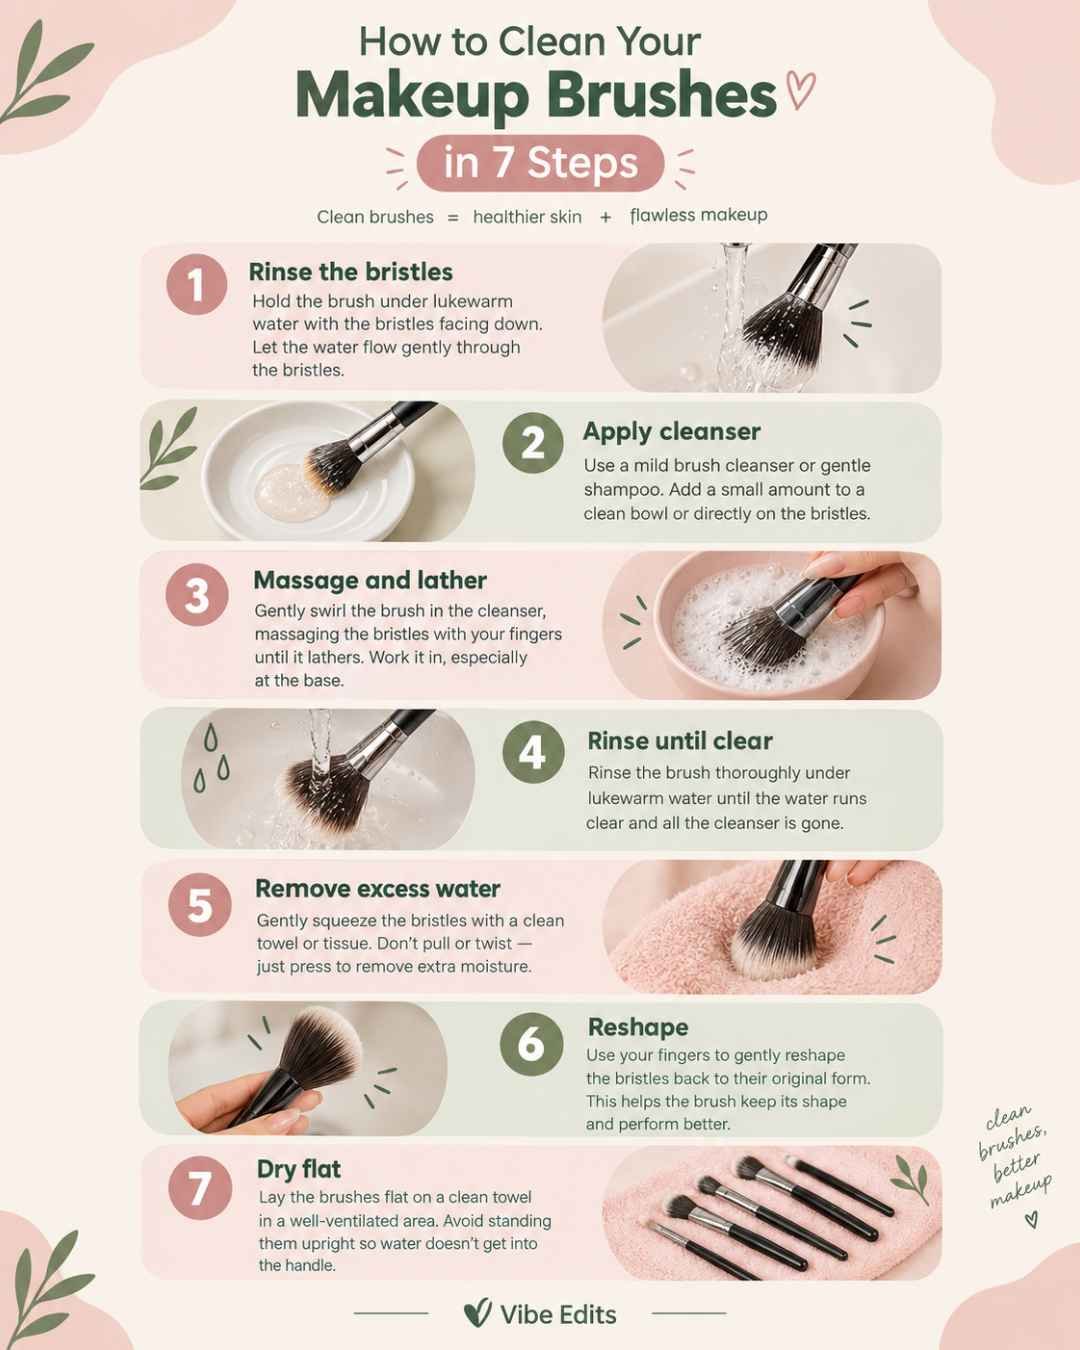
This is the exact routine I follow when I wash my brushes. A full set takes about ten minutes, and it is the simplest answer I have found to how to wash makeup brushes without damaging them.
1. Rinse the Bristles
Hold the brush with the bristles pointing down under a gentle stream of lukewarm water. Keep the water on the bristles only. Tilting the brush upward lets water run into the ferrule, which is the most common way people loosen their brushes without realizing it.
2. Apply Cleanser
Put a small drop of gentle soap or makeup brush cleaner in your palm or on the mat. A pea-sized amount is plenty for most brushes. Extra soap only means extra rinsing later.
3. Massage and Lather
Swirl the bristles gently in the soap using small circles. You will see foundation, powder, or eyeshadow lift into the lather.
Go Slowly With Dense Brushes
A packed foundation brush needs more patience than a fluffy blush brush. Work the soap in from the tips toward the base, and stop before you reach the ferrule.
4. Rinse Until Clear
Rinse under lukewarm water, squeezing the bristles lightly, until the water runs clear and no suds remain. Repeat steps two through four if you still see color. A brush that looks clean but still feels sticky usually needs one more round.
5. Remove Excess Water
Press the bristles into a clean towel and squeeze gently from the base to the tip. Never twist or wring the brush, because that bends the bristles and can pull them loose.
6. Reshape the Brush
Use your fingers to mold the bristles back into their original shape. This matters most for angled brushes, eyeshadow brushes, and tapered ones. A brush that dries in the wrong shape tends to stay that way.
7. Dry It Correctly
Lay the brush flat on a clean towel, with the bristles hanging slightly over the edge of the counter. Let it dry completely, which usually takes several hours or overnight. I cover drying in more detail below.
How Often Should You Clean Makeup Brushes?
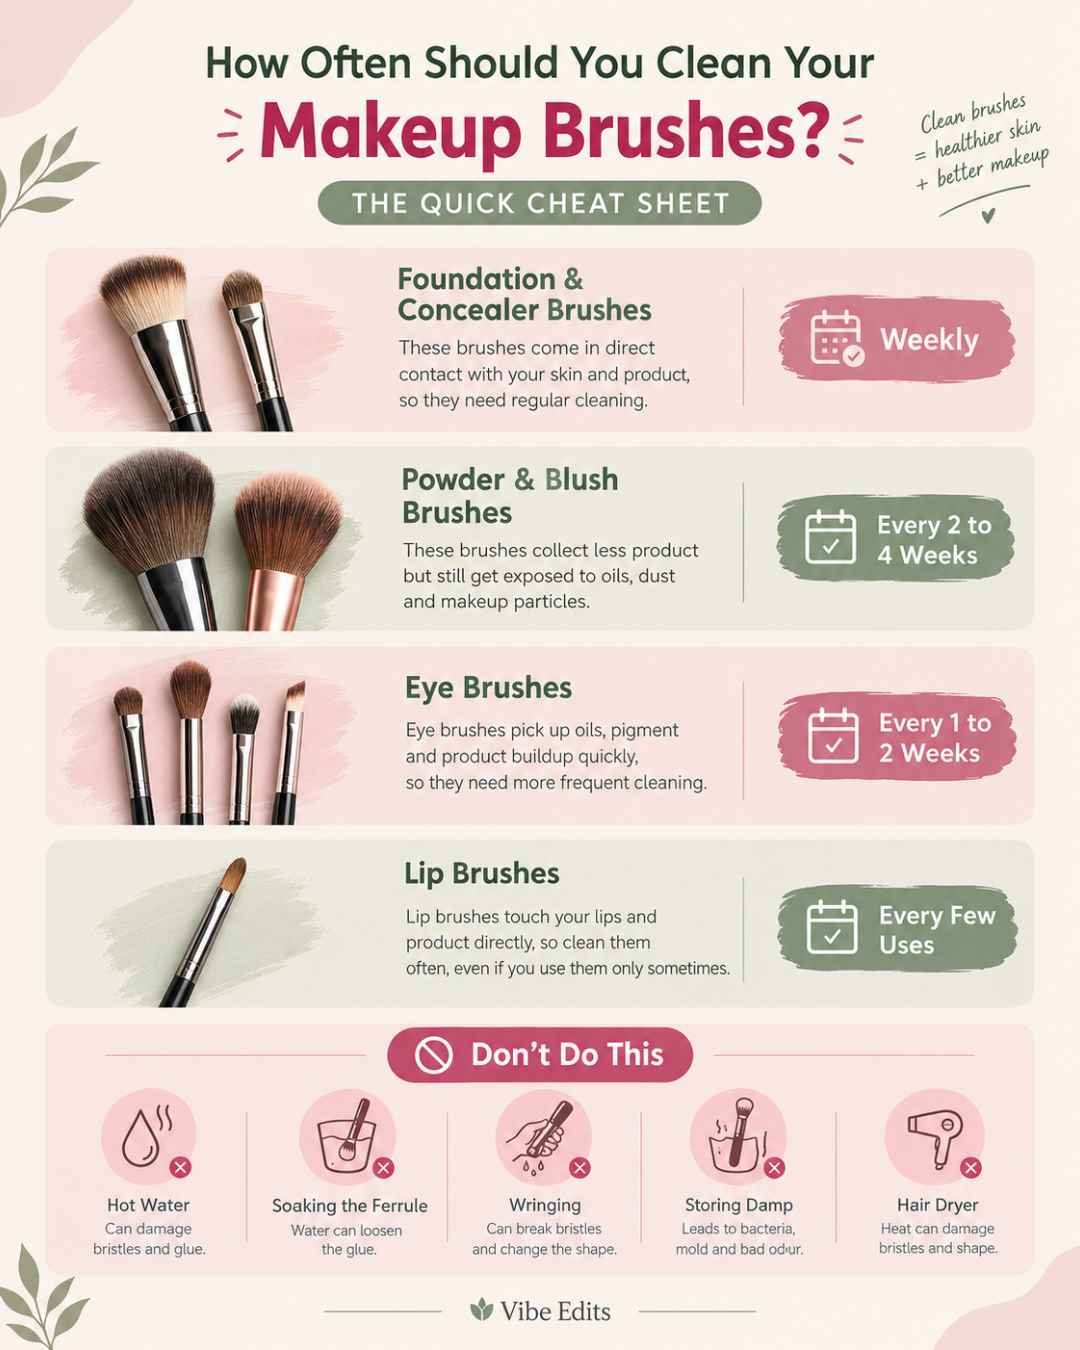
This is one of the questions I hear most. The honest answer is that it depends on what the brush touches. The American Academy of Dermatology suggests washing brushes every 7 to 10 days as a general rule, while Cleveland Clinic gives more specific guidance by product type. Here is the schedule I use:
- Foundation brush and concealer brush: about once a week, since liquid and cream products hold onto bacteria and oil.
- Powder brush and blush brush: every two to four weeks, depending on how often you use them.
- Eye makeup and eyeshadow brushes: every one to two weeks, and more often if you wear eye makeup daily.
- Lip brushes: after every few uses, since they touch product and skin directly.
Treat these as practical guidelines, not strict medical rules. If a brush looks stained, feels stiff, or smells odd, wash it no matter what the calendar says.
How I Remember My Cleaning Day
I tie my brush washing to a weekly reset. Sunday evening is when I do a few small tasks that make the week easier, a bit like the habits in my self-care Sunday ideas. Attaching a chore to an existing routine is the only reason I have kept it up.
Cleaning Different Makeup Brush Types
Not every brush behaves the same under water, so a few small adjustments help.
Foundation and Concealer Brushes
These collect the most product because they handle liquids and creams. Give them extra massage time and expect to rinse twice. If a brush stays stubborn, jump to the section on buildup further down.
Powder and Blush Brushes
These are fluffier and release product easily. A single wash is often enough. Squeeze gently, because large soft heads hold a surprising amount of water.
Eye Makeup Brushes
Small eyeshadow brushes pick up pigment and oils from the delicate eye area. Clean them more often, and be gentle so you do not bend the tiny bristles.
What Is the Best Makeup Brush Cleaner?
People often ask about the best way to clean makeup brushes, and the answer comes down to what you will actually use every week.
What Can I Use to Clean Makeup Brushes?
Several options work well:
- Liquid brush cleanser: made for makeup and great for foundation brushes.
- Solid brush cleanser: a small bar you swirl the brush against, popular for travel.
- Mild liquid soap or baby shampoo: inexpensive and easy to find.
- Gentle clarifying shampoo: the American Academy of Dermatology lists this as an option.
Avoid harsh dish soaps or anything that leaves bristles dry and scratchy. If your skin is sensitive, choose a fragrance-free cleanser so less residue stays behind.
A Note on Sensitive Skin
If your skin gets irritated easily, wash brushes more often and rinse extra well. Cleaning brushes does not treat any skin condition, though. If you are unsure what is behind recurring irritation, a dermatologist is the right person to ask.
Spot Cleaning vs. Deep Cleaning
Spot cleaning is a quick refresh between washes. Spray a brush cleaner onto a paper towel and swipe the bristles across it until the color stops transferring. It works well for eyeshadow brushes when you want to switch shades mid-routine.
Deep cleaning is the full wash from the seven steps above. It removes makeup residue from the base of the bristles, where a quick wipe cannot reach.
Spot cleaning is a helpful bridge, but it is not a replacement. I spot clean during the week and deep clean on my weekly reset.
How to Dry Makeup Brushes Without Damaging Them
Drying is where most of the damage happens, and it is the step people rush. Here is what works for me:
- Lay brushes flat on a towel, or let them hang bristles-down over the edge of a counter.
- Keep them away from direct heat. Skip the hair dryer, since heat and strong airflow can harm the glue and the brush shape.
- Allow plenty of time, and never put a damp brush back into a closed pouch.
Why Not Dry Them Standing Upright?
Standing a brush handle-down lets water sink into the ferrule. Over time that loosens the adhesive, and the bristles start shedding. Flat or bristles-down keeps water moving away from the base.
Quick Drying Tip for Busy Mornings
If you need a brush soon, wash it in the evening. By morning it will be dry and ready.
7 Mistakes to Avoid When Cleaning Makeup Brushes
I made several of these myself before I figured things out.
- Using hot water. It can soften the glue in the ferrule.
- Soaking the whole brush. Water in the ferrule is the fastest way to ruin a good brush.
- Twisting or wringing the bristles. This bends and breaks them.
- Using too much soap. It leaves residue that can irritate skin.
- Storing brushes damp. Moisture can encourage mildew and bacteria.
- Using a hair dryer or heater. Heat can warp the shape and loosen the adhesive.
- Waiting too long between washes. The longer product sits, the harder it is to remove.
A Small Reminder
Every one of these mistakes comes from rushing. Slow down and your brushes will last far longer.
How to Clean Foundation Brushes and Other Brushes With Stubborn Buildup
Some foundation brushes hold on to product like it is paid rent. If a regular wash is not enough, try this:
- Add a small drop of mild soap, then massage on a silicone mat for a little longer.
- Rinse and repeat until no color shows in the lather.
- For oil-based or waterproof formulas, apply a bit of brush cleanser first and let it sit for about thirty seconds before rinsing.
Be patient and avoid scrubbing hard. If a brush still will not come clean after a couple of rounds, it may be time to replace it.
When Should You Replace a Makeup Brush?
Even well-cared-for brushes wear out. Replace a brush when:
- The bristles are badly frayed or shedding.
- The shape no longer holds after washing.
- It stays stained or sticky after repeated cleaning.
- It smells unpleasant even when dry.
A good brush can last years, but there is no shame in retiring one that has done its job.
How to Store Clean Makeup Brushes
Once your brushes are fully dry, store them somewhere they can breathe. A cup or holder with the bristles facing up keeps shapes intact, as long as the brushes are completely dry. For travel, use a pouch or case, but only after drying.
Keep brushes away from steamy bathroom corners where moisture lingers. A drawer or vanity shelf works better.
Here is a simple maintenance checklist:
- Spot clean after heavy use.
- Deep clean on your weekly reset.
- Dry flat and completely.
- Store clean, dry brushes away from humidity.
Brush day also makes a good time for other small beauty tasks, like a DIY hair mask while your brushes dry.
Looking for more practical beauty, wellness, and self-care ideas? Explore Vibe Edits for more beginner-friendly guides.
Frequently Asked Questions
1. How often should I wash my makeup brushes?
For a simple routine, clean frequently used foundation and concealer brushes about weekly. Powder and eye brushes can often go longer, depending on use. The American Academy of Dermatology recommends washing makeup brushes every 7 to 10 days.
2. Can I use regular soap to clean makeup brushes?
A gentle cleanser or mild soap is a better choice than harsh products. Focus on removing residue without stripping or damaging the bristles.
3. Should I wet the whole makeup brush?
No. Keep water focused on the bristles and avoid soaking the ferrule and handle, because excess water can weaken the adhesive.
4. Can I dry makeup brushes with a hair dryer?
It is better to air dry them. Heat and strong airflow can damage brush shape and adhesive.
5. When should I replace a makeup brush?
Replace it when the bristles become badly frayed, the shape no longer holds, or the brush is difficult to clean properly.
Quick Tip 1
Clean your brushes the evening before you need them so they are fully dry by morning.
Quick Tip 2
Never store a brush while it is still damp.
Conclusion: Make Cleaning Your Makeup Brushes a Habit
Learning how to clean your makeup brushes is one of the easiest upgrades you can make to your routine. It takes ten minutes, costs almost nothing, and your makeup will blend better for it.
Start small. Pick one day a week, wash your foundation and concealer brushes first, and add the rest as it becomes a habit. If you are building a calmer weekly rhythm, pair it with a short stretch session from my morning yoga routine for beginners.
Quick poll: How often do you really wash your brushes? Weekly, monthly, or “what is a brush wash?” Tell me in the comments, and share your best brush-cleaning tip while you are there.